The EcoOBD2 chip is designed to boost your car’s performance and fuel efficiency by optimizing engine settings. This plug-and-play device is popular among car enthusiasts looking for a simple upgrade. Understanding its features, including the reset button, is key to using it effectively. This guide will show you where to find the reset button on your EcoOBD2 and how to use it.
The EcoOBD2 device is easily recognizable, often coming in green for gasoline engines. It’s marketed as a user-friendly way to achieve up to a 15% increase in fuel efficiency. One of the advantages highlighted is its ease of installation – simply plugging it into your car’s OBD2 port. This port is a standard feature in most modern cars, typically located under the steering wheel.
Locating the Reset Button on Your Eco OBD2 Chip
The reset button on the EcoOBD2 is intentionally discreet. It’s designed as a small, pinhole-sized button to prevent accidental resets. To find it, look closely at the EcoOBD2 device itself. The reset button is located on the surface of the device, usually near the logo. It’s a tiny indentation that requires a pointed object, like a paperclip or pin, to press.
Step-by-Step Guide to Resetting Your Eco OBD2
Resetting your EcoOBD2 chip is a straightforward process, often needed during initial setup or troubleshooting. Here’s how to do it:
- Turn off your car’s ignition: Make sure your car is completely turned off and the key is removed from the ignition.
- Locate the OBD2 port: If you’re unsure where it is, check under your steering wheel or above the pedals. Refer to your car’s manual if needed.
- Plug in the EcoOBD2: Firmly insert the EcoOBD2 chip into the OBD2 port.
- Turn the ignition to ACC mode: Insert the key and turn it one click to the right. This activates the car’s accessories without starting the engine.
- Press the Reset Button: Using a paperclip or pin, gently press and hold the reset button located on the EcoOBD2 device for about 5 seconds. You should feel a slight click.
- Release the Reset Button: Release the button and wait for 30-40 seconds. This allows the EcoOBD2 to communicate and establish a connection with your car’s Engine Control Unit (ECU).
- Start your engine: Start your car’s engine as usual. Your EcoOBD2 chip should now be reset and calibrating with your vehicle.
When Might You Need to Reset Your Eco OBD2?
While the EcoOBD2 is designed to work seamlessly, there are a few scenarios where resetting it might be necessary:
- Initial Installation: Resetting after the initial plug-in ensures a fresh start for calibration with your car’s ECU.
- Troubleshooting: If you experience any issues or inconsistent performance after installation, a reset can help re-establish the connection and recalibrate the chip.
- Moving to a New Car: Although generally plug-and-play, resetting before installing in a different vehicle can help ensure optimal performance.
Is EcoOBD2 Safe for Your Car?
The EcoOBD2 chip is designed with safety in mind. It operates within the engine’s factory safety parameters and does not remap or override the ECU. It’s marketed as a safe upgrade that won’t void your car’s warranty because it’s easily removable and returns the car to its stock settings when unplugged.
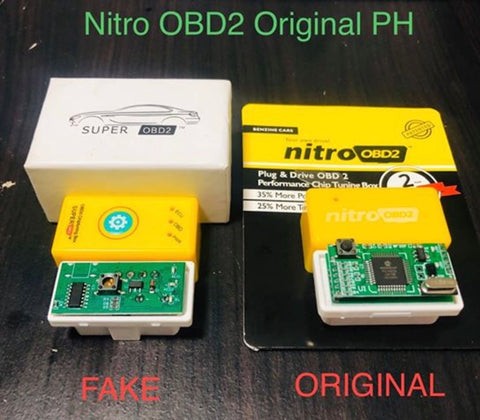
Beware of Counterfeit EcoOBD2 Chips
When purchasing an EcoOBD2 chip, it’s crucial to buy from reputable sources. Fake chips are circulating online and may not deliver the promised performance or safety features. Always check for authentic product packaging and warranty information.
In conclusion, understanding where the reset button is on your EcoOBD2 device and how to use it is essential for optimal performance. By following these simple steps, you can ensure your EcoOBD2 chip is properly installed and functioning, helping you potentially improve your car’s fuel efficiency.