For Tesla Model 3 owners interested in accessing advanced vehicle diagnostics and performance data, understanding the OBD2 port location is crucial. Unlike traditional vehicles, the Tesla Model 3’s diagnostic port is not immediately obvious. This guide provides a step-by-step walkthrough on how to locate and access the OBD2 port in your Tesla Model 3, enabling you to use tools like OBDLink dongles and apps such as Scan My Tesla or TM-Spy.
Before you begin, it’s essential to gather the necessary equipment:
- OBDLink OBD2 dongle: A reliable interface to communicate with your Tesla’s systems.
- Compatible App: Software like Scan My Tesla or TM-Spy to interpret the diagnostic data.
- Tesla Model 3 diagnostic cable: An adapter specifically designed to connect standard OBD2 tools to Tesla’s proprietary port.
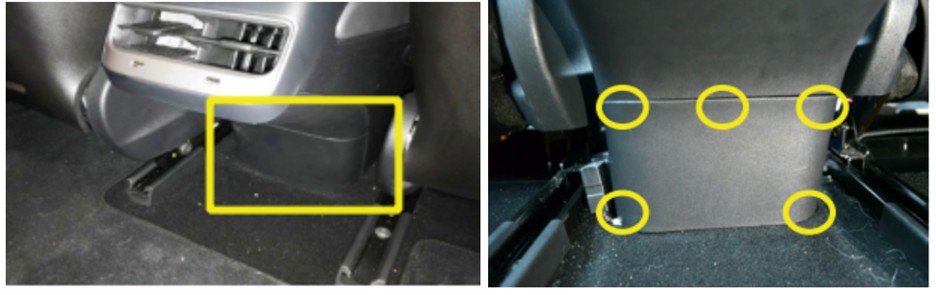
Locating the Diagnostic Connector in Your Tesla Model 3
The OBD2 diagnostic port in the Tesla Model 3 is strategically placed to maintain the vehicle’s sleek interior design. You won’t find it under the dashboard like in most cars. Instead, it’s located in the rear of the center console, beneath the rear air vents. Accessing it requires removing a small cover, which we’ll detail below.
Step-by-Step Guide to Accessing the Tesla Model 3 OBD2 Port
Crucial Pre-Shutdown Procedure:
Before you even think about plugging in any cables, power off your Tesla Model 3 completely. This is not just turning off the screen; it’s a full system shutdown. Navigate through your Tesla’s touchscreen menu to initiate the shutdown process (typically found under ‘Safety & Security’ or ‘Controls’). This process takes approximately 15 minutes. Failure to properly shut down the vehicle can lead to damage and system errors.
Accessing the Connector:
-
Prepare the Interior: Begin by sliding both front seats as far forward as they can go. This will give you ample space to work in the rear passenger footwell.
-
Identify the Rear Center Console Panel: Move to the back seat and look at the base of the center console, between the front seats. You’ll see a small plastic panel. This is the access cover for the diagnostic port. It’s secured by five push-fit clips, designed for manual removal.
-
Loosening the Panel (Right Side, Bottom Clip): Using an Allen wrench or an L-shaped screwdriver, carefully insert the short end of the tool under the right side of the panel.
-
Leverage and Release: Rotate the tool so the short end is vertical. Gently pull the tool towards you, parallel to the floor. This action should release the bottom right clip securing the panel.
-
Remove the Panel: Now, using your hands, gently pull the panel towards you to disengage the remaining clips. Work your way around the panel to loosen and detach all five clips, and then remove the panel completely.
-
Locate and Connect: Inside the newly opened compartment, you will find the Tesla Proprietary Diagnostic Connector. It’s a white connector held in place by a clip. Press the clip to release the white connector and slide it to the left.
-
Cable Connection: Take your Tesla diagnostic cable and plug the two white ends into the corresponding connectors within the vehicle. They are designed to fit only one way, so ensure they click securely into place.
-
OBDLink Dongle Connection: Once the diagnostic cable is connected, you can plug in your OBDLink dongle into the standard OBD2 port on the other end of the cable. You can then pair the dongle with your smartphone or tablet and use your chosen app (Scan My Tesla or TM-Spy) to access vehicle data.
Important Safety Note:
Connecting any aftermarket equipment to your Tesla is undertaken entirely at your own risk. Neither the cable provider nor any guide can be held responsible for damage to your vehicle resulting from improper use or installation. Always inspect your diagnostic cable for damage before each use, ensuring it is in perfect condition. The provided cable serves as an adapter to read data from your car, utilizing the vehicle’s CAN Hi and Lo signals and providing power to the OBD dongle. Be cautious and follow these instructions precisely to minimize any risk.