Modern vehicles are equipped with an On-Board Diagnostics system, or OBD2, that constantly monitors your car’s performance. When it detects an issue, it triggers a diagnostic trouble code and often illuminates the check engine light. Typically, you would use an OBD2 scanner to read and reset these codes. However, what if you find yourself without a scanner and need to clear those codes?
This guide, brought to you by the auto repair experts at obd2global.com, will walk you through several effective methods to reset OBD2 codes without relying on a dedicated scanner. We’ll delve into why resetting codes might be necessary and provide step-by-step instructions for each technique, ensuring you can confidently manage your vehicle’s diagnostics.
Understanding Why Resetting OBD2 Codes Can Be Necessary
Alt text: Automotive technician using a Foxwell OBD2 scanner to diagnose and reset car error codes.
Before exploring the methods, it’s crucial to understand the reasons behind resetting OBD2 codes. Knowing the “why” will help you determine if resetting is the right course of action in your situation.
- Clearing Error Codes and the Check Engine Light: After addressing the underlying issue that triggered the code, the check engine light may remain illuminated. Resetting the codes effectively clears these stored errors, turning off the light and removing any potential dashboard warnings. This is particularly useful if you’ve completed a repair and want to confirm the problem is resolved.
- Preparing for Emissions Tests: Many regions require vehicles to pass emissions tests. A lit check engine light, even for a resolved issue with a lingering code, can cause your car to fail. Resetting the codes after fixing emissions-related problems can ensure your vehicle is ready for inspection.
- Temporary Diagnostic Step (Use with Caution): In some situations, resetting codes can serve as a temporary measure to turn off the check engine light. This can be helpful to assess if a problem recurs after a reset, providing further diagnostic information. However, it’s vital to emphasize that resetting codes should not be used to mask underlying issues. Always address the root cause of the problem. Ignoring persistent codes can lead to more significant damage and costly repairs down the line.
Proven Methods to Reset OBD2 Codes Without a Scanner
While an OBD2 scanner provides the most direct and informative way to manage codes, several alternative methods can effectively reset them without specialized equipment. Let’s explore these techniques in detail:
Method 1: The Battery Disconnect Method – The Simplest Approach
Disconnecting your car’s battery is a straightforward way to reset the ECU (Engine Control Unit) and clear stored OBD2 codes. This method works because disconnecting the power source forces the car’s computer to reset its memory, including the error codes.
Step-by-Step Guide:
- Ensure Ignition is OFF: Turn off your car completely and remove the keys from the ignition. This is crucial for safety and to prevent electrical issues during the process.
- Locate the Car Battery: Open your vehicle’s hood and find the battery. It’s typically located in the engine bay, but in some models, it might be under the back seat or in the trunk.
- Disconnect the Negative Terminal: Using a wrench of the correct size, loosen the nut on the negative battery terminal. This terminal is usually black and marked with a “-” sign. Carefully remove the negative cable from the terminal. Always disconnect the negative terminal first to prevent accidental short circuits.
- Wait for 15-20 Minutes: Allow sufficient time for the car’s electrical system to fully discharge. This ensures that the ECU memory is completely reset. Some mechanics recommend pressing the brake pedal a few times during this waiting period to help drain any residual power in the system.
- Reconnect the Negative Terminal: After waiting, carefully reconnect the negative battery cable to the terminal and tighten the nut securely with the wrench. Ensure a firm connection.
- Turn On the Ignition and Check: Start your car and observe if the check engine light is off. If it is, the battery disconnect method has successfully reset the OBD2 codes.
Important Notes:
- Radio and Clock Reset: Disconnecting the battery will also reset your car’s radio settings, clock, and potentially other electronic preferences. You will need to reset these after reconnecting the battery.
- Potential for Data Loss: In some advanced vehicle systems, disconnecting the battery might lead to the loss of certain learned settings or require recalibration of systems like the electronic stability program (ESP). Consult your car’s manual for any specific warnings or procedures related to battery disconnection.
Method 2: Utilizing the Fuse Box – ECU Fuse Removal
Another method to reset OBD2 codes involves removing the fuse that specifically powers the car’s ECU. This is a more targeted approach compared to disconnecting the entire battery and can sometimes be preferred to avoid resetting all electronic systems.
Step-by-Step Guide:
- Turn Off the Ignition: Make sure the car is completely off before proceeding.
- Locate the Fuse Box: Refer to your vehicle’s owner’s manual to find the location of the fuse box. Cars typically have fuse boxes located under the dashboard, in the engine compartment, or sometimes in both places.
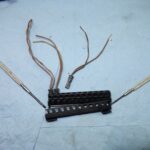
- Identify the ECU Fuse: Consult your car’s manual for the fuse box diagram. This diagram will show you the location of the fuse that controls the ECU or ECM (Engine Control Module). The fuse is usually labeled as “ECU,” “ECM,” “Engine Control,” or similar.
- Remove the ECU Fuse: Using a fuse puller (often found in the fuse box itself or available at auto parts stores) or needle-nose pliers, carefully pull out the identified ECU fuse. Handle the fuse gently to avoid damage.
- Wait for 15-20 Minutes: Allow sufficient time for the system to reset after removing the fuse.
- Reinsert the Fuse: After waiting, firmly push the ECU fuse back into its slot in the fuse box, ensuring it is securely seated.
- Turn On the Ignition and Check: Start your car and check if the check engine light has turned off. If so, the fuse removal method was successful.
Important Notes:
- Car Manual is Essential: Identifying the correct ECU fuse is crucial. Always rely on your vehicle’s owner’s manual for accurate fuse box diagrams and fuse locations. Incorrectly removing the wrong fuse could affect other vehicle systems.
- Fuse Puller Recommended: Using a fuse puller is recommended for safely removing fuses without damaging them or the fuse box.
Method 3: Performing a Drive Cycle – For Specific Readiness Monitors
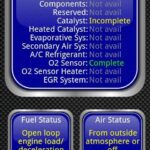
A drive cycle is a specific sequence of driving conditions designed to allow the car’s onboard diagnostic system to run self-tests and verify the functionality of various emission control systems. Completing a drive cycle can sometimes reset OBD2 codes, particularly those related to emissions, by allowing the system to confirm that the issue is no longer present.
General Drive Cycle Procedure (Consult Your Vehicle’s Specific Procedure):
- Cold Start: Start the engine when it’s cold, ideally after the car has been sitting for at least eight hours. This ensures the engine temperature sensors are at ambient temperature.
- Idle Phase: Let the engine idle in park or neutral for approximately two to three minutes. Avoid using any accessories during this phase.
- Acceleration Phase: Accelerate smoothly to a speed of 50-55 mph (80-88 km/h) and maintain this speed for about five minutes.
- Deceleration Phase: Release the accelerator pedal completely and allow the vehicle to coast down to 20 mph (32 km/h) without applying the brakes.
- Constant Speed Phase: Maintain a steady speed of 40-45 mph (64-72 km/h) for approximately eight minutes.
- Stop and Idle Phase: Bring the vehicle to a complete stop and let it idle in neutral or park for five minutes.
Important Notes:
- Vehicle-Specific Drive Cycle: The drive cycle procedure can vary significantly between vehicle manufacturers and even different models within the same brand. Always consult your vehicle’s repair manual or search online for the specific drive cycle procedure recommended for your car’s make, model, and year.
- Traffic Conditions: Performing a drive cycle requires specific driving conditions that might be challenging to achieve in heavy traffic or urban areas. Choose a safe location and time with minimal traffic to execute the drive cycle effectively and safely.
- Not Always Effective for All Codes: Drive cycles are primarily designed to reset “readiness monitors” related to emissions systems. They may not be effective in resetting all types of OBD2 codes, especially those related to engine performance or other non-emission-related issues.
Method 4: Utilizing a Bluetooth OBD2 Adapter and a Smartphone App – A Low-Cost Digital Approach
Alt text: Display screen of a Foxwell OBD2 car diagnostic scanner showing various system diagnostic functions.
While this method technically involves using an OBD2 adapter, it’s a significantly more affordable and accessible alternative to a dedicated scanner. Bluetooth OBD2 adapters are inexpensive and, when paired with a smartphone app, can provide basic OBD2 code reading and resetting capabilities.
Step-by-Step Guide:
- Purchase a Bluetooth OBD2 Adapter: Obtain a compatible Bluetooth OBD2 adapter online or from auto parts retailers. These adapters are typically inexpensive and readily available.
- Locate the OBD2 Port: Find the OBD2 port in your vehicle. It’s usually located under the dashboard on the driver’s side, near the steering column.
- Plug in the OBD2 Adapter: With the ignition off, plug the Bluetooth OBD2 adapter securely into the OBD2 port.
- Download a Compatible Smartphone App: Download an OBD2 diagnostic app on your smartphone. Popular options include Torque Pro (Android), OBD Fusion (iOS and Android), and Car Scanner ELM OBD2 (iOS and Android). Many apps offer free and paid versions with varying features.
- Pair the Adapter with Your Smartphone: Turn the ignition to the “ON” position (do not start the engine). Enable Bluetooth on your smartphone and follow the app’s instructions to pair with the OBD2 adapter. The adapter usually appears as a Bluetooth device in your phone’s settings.
- Use the App to Reset Codes: Once paired, open the OBD2 app. Navigate to the ” диагностика,” “Fault Codes,” or similar section within the app. The app should display any stored OBD2 codes. Look for an option to “Clear Codes,” “Reset DTCs,” or similar, and follow the app’s prompts to reset the codes.
Important Notes:
- Limited Functionality Compared to Dedicated Scanners: While Bluetooth OBD2 adapters and apps can reset codes, they generally offer fewer advanced diagnostic features compared to dedicated handheld scanners. They may not provide in-depth system analysis, live data streaming, or bidirectional control capabilities.
- App Compatibility: Ensure the OBD2 app you choose is compatible with your smartphone’s operating system (iOS or Android) and the Bluetooth OBD2 adapter you purchased. Check app reviews and descriptions for compatibility information.
- “Reader-Assisted” Reset: While not strictly “without a reader,” this method provides a digital, low-cost way to reset codes and offers some basic diagnostic information, making it a practical alternative for many users.
Conclusion: Managing OBD2 Codes Without a Dedicated Scanner
While a dedicated OBD2 scanner offers the most comprehensive and user-friendly approach to managing diagnostic codes, these alternative methods provide viable solutions when a scanner is unavailable. Whether you choose to disconnect the battery, remove a fuse, perform a drive cycle, or utilize a Bluetooth OBD2 adapter with a smartphone app, you can effectively reset OBD2 codes and address check engine light issues.
However, remember that resetting codes is only a part of the process. It’s crucial to identify and repair the underlying cause of the problem that triggered the code in the first place. If the check engine light returns shortly after resetting, it indicates a persistent issue that requires professional diagnosis and repair.
Always consult your vehicle’s owner’s manual and exercise caution when working with your car’s electrical system. If you are unsure about any of these procedures, it’s best to seek assistance from a qualified automotive technician. By understanding these methods, you can take a proactive approach to vehicle maintenance and ensure your car runs smoothly and efficiently.
FAQs About Resetting OBD2 Codes Without a Scanner
Can I reset my car’s check engine light without a scanner?
Yes, as detailed in this guide, you can effectively reset your check engine light and OBD2 codes using methods like disconnecting the battery, removing the ECU fuse, performing a drive cycle, or using a Bluetooth OBD2 adapter with a smartphone app.
Will resetting codes without a scanner harm my car’s performance?
No, resetting OBD2 codes using the methods described will not typically harm your car’s performance. These methods primarily clear stored diagnostic information from the car’s computer. However, it’s crucial to address the underlying issues that triggered the codes to prevent potential future problems and maintain optimal performance.
How long does it take to reset car codes without a scanner?
The time required to reset car codes without a scanner varies depending on the method used. Disconnecting the battery or removing the ECU fuse usually takes about 15-20 minutes of waiting time. Performing a drive cycle can take 20-30 minutes or longer, depending on traffic conditions and the specific procedure. Using a Bluetooth OBD2 adapter and app is generally the quickest method, often resetting codes within a few minutes once connected.