Seeing your car’s check engine light illuminate on the dashboard can be unsettling. It’s your vehicle’s way of signaling that something isn’t quite right under the hood. While it could be a minor issue like a loose gas cap, it could also indicate a more significant problem requiring attention. Understanding how to diagnose and address this warning light is crucial for every car owner. Fortunately, with the help of an OBD2 scanner, resetting your check engine light is a task you can often handle yourself.
Decoding the Check Engine Light Mystery
Modern vehicles are sophisticated machines equipped with numerous sensors and computer systems monitoring their operation. When one of these systems detects a malfunction or reading outside of normal parameters, the check engine light (CEL) is triggered. Ignoring this light can sometimes lead to more serious damage and costly repairs down the line. Addressing the issue promptly is always the best course of action.
Common culprits behind a lit check engine light can range from simple fixes to more complex problems:
- Loose Gas Cap: This is a frequent and easily resolved issue. A loose gas cap can cause evaporative emissions system leaks, triggering the CEL.
- Faulty Oxygen Sensors: Oxygen sensors play a vital role in monitoring exhaust gases. Malfunctioning sensors can disrupt the engine’s air-fuel mixture and activate the check engine light.
- Spark Plug or Ignition Coil Issues: Worn spark plugs or faulty ignition coils can lead to misfires, reduced engine performance, and a lit CEL.
- Catalytic Converter Problems: The catalytic converter is essential for reducing harmful emissions. Issues within this system can trigger the check engine light.
- Mass Air Flow (MAF) Sensor Malfunction: The MAF sensor measures the air entering the engine. A faulty sensor can cause incorrect fuel delivery and CEL activation.
OBD2: Your Key to Check Engine Light Diagnosis
For vehicles manufactured in 1996 and onwards, diagnosing the check engine light has become significantly easier thanks to the standardized On-Board Diagnostics II (OBD2) system. This system is designed to monitor various vehicle systems and provide diagnostic trouble codes (DTCs) when issues arise. To access these codes, you’ll need an OBD2 scanner.
An OBD2 scanner is a user-friendly tool that plugs into your car’s diagnostic port, typically located beneath the dashboard on the driver’s side. Once connected, the scanner reads the fault codes stored by your car’s computer, giving you a starting point for diagnosing the problem.
OBD2 scanners come in various forms, from basic handheld devices to more advanced Bluetooth-enabled scanners that connect to your smartphone. Many auto parts stores also offer free code reading services if you prefer not to purchase a scanner immediately.
Step-by-Step Guide: Diagnosing Your Check Engine Light with OBD2
Let’s walk through the process of using an OBD2 scanner to diagnose your check engine light:
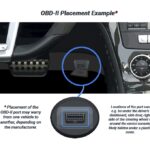
1. Locate the OBD2 Diagnostic Port:
First, ensure your vehicle is parked and the engine is turned off. Locate the OBD2 diagnostic port. It’s usually situated under the dashboard, often near the steering column or pedals. The port is typically trapezoidal in shape, designed to fit the connector of your OBD2 scanner. You might need to remove a small plastic cover to access it.
2. Connect and Retrieve the Fault Code:
With your OBD2 scanner ready, start your car’s engine. Plug the scanner’s connector firmly into the diagnostic port. Turn on the scanner – it should power up automatically once connected. After a few moments, the scanner will communicate with your car’s computer and display any stored fault codes. Note down the displayed code(s). They usually follow a format like “P0123” (a letter followed by four digits). Once you have the code, you can turn off the engine.
3. Interpret the Diagnostic Trouble Code (DTC):
Now that you have the fault code, you need to understand what it means. You can consult the user manual that came with your OBD2 scanner, which often includes a list of common codes. Alternatively, a quick online search for “OBD2 code [your code]” will provide you with a description of the fault.
Some codes are very specific, pinpointing a particular component failure (e.g., “P0304 – Cylinder 4 Misfire”). Others are more general, indicating a system issue that requires further investigation (e.g., “P0442 – Evaporative Emission Control System Leak Detected (small leak)”). If the code description is unclear, online automotive forums or consulting a mechanic can provide further clarity.
Resetting the Check Engine Light Using an OBD2 Scanner
After you have diagnosed the issue and ideally addressed the underlying problem, you can use your OBD2 scanner to reset the check engine light. It’s important to note that simply resetting the light without fixing the issue is not recommended. The light will likely reappear if the problem persists. Resetting should be done after you have made necessary repairs or confirmed the issue was temporary or minor (like a tightened gas cap).
Here’s how to reset the check engine light with an OBD2 scanner:
1. Connect Your OBD2 Scanner:
Just as you did for diagnosis, connect your OBD2 scanner to your vehicle’s diagnostic port with the engine running. Allow the scanner to power up and establish communication with your car’s computer.
2. Erase the Fault Codes:
Navigate the scanner’s menu to find the “Erase Codes,” “Clear Codes,” or similarly worded option. The exact menu names may vary slightly depending on your scanner model. Select this option and confirm your choice. The scanner will send a command to your car’s computer to clear the stored fault codes. Once completed, the scanner should indicate that no fault codes are present, and the check engine light on your dashboard should turn off. You can now turn off the car’s engine and disconnect the scanner.
3. Verify the Reset and Monitor:
To ensure the check engine light stays off and the system is functioning correctly, it’s advisable to drive your car for a bit – typically 30 to 100 miles. This allows your vehicle’s onboard systems to run through their diagnostic cycles and recalibrate sensors. If the check engine light remains off after this drive cycle, you have successfully reset it.
Important Note: If the check engine light reappears shortly after resetting, it signifies that the underlying issue was not resolved. You’ll need to re-diagnose the problem and address it appropriately.
Alternative Methods (Use with Caution)
While using an OBD2 scanner is the most reliable and recommended method for resetting a check engine light, there are a couple of alternative methods that are sometimes suggested, but should be approached with caution:
- Battery Disconnection: Disconnecting the car battery can sometimes reset the computer and clear the check engine light. To do this, disconnect the negative battery terminal first, followed by the positive terminal. Wait for about 15-30 minutes before reconnecting, positive terminal first, then negative. However, this method can also reset other vehicle systems, including radio presets and security systems, and is generally not recommended as a primary method.
- Driving and Self-Correction: In some very minor cases, if the issue was temporary (like a momentary sensor glitch), the check engine light might turn off on its own after several drive cycles once the system detects normal operation again. This is only advisable if you are confident the issue was minor and has resolved itself, and you have not used an OBD2 scanner to confirm the code and clear it.
Pre-1996 Vehicles
For cars older than 1996, the OBD2 system is not standardized. Diagnosing and resetting the check engine light on these vehicles often requires different procedures, which can vary significantly between makes and models. Typically, fault codes are displayed through a series of flashes of the check engine light itself (similar to Morse code). Resetting often involves making the necessary repairs and, if needed, temporarily disconnecting the battery. Consult your vehicle’s repair manual or a professional mechanic for specific guidance on pre-1996 vehicles.
When the Check Engine Light Returns
If your check engine light comes back on after you’ve reset it, it’s a clear indication that the underlying problem persists. In such cases, further diagnosis and repair are necessary. If you’re not comfortable with automotive troubleshooting, it’s always best to seek assistance from a qualified mechanic to properly diagnose and fix the issue.
Conclusion: Take Control of Your Check Engine Light
The check engine light doesn’t have to be a source of anxiety. With an OBD2 scanner and a little understanding, you can confidently diagnose and often reset this warning light yourself. Remember to prioritize diagnosing and addressing the root cause of the problem, and use the OBD2 reset function as a tool to confirm the fix, not as a way to mask underlying issues. By being proactive and informed, you can keep your vehicle running smoothly and avoid potential costly repairs down the road.
Disclaimer: This article is for informational purposes only and should not be considered a substitute for professional automotive advice. Always consult with a certified mechanic or your vehicle manufacturer for specific diagnoses and repair procedures. If attempting any DIY repairs, prioritize safety and follow all necessary precautions.