The sudden appearance of a check engine light in your Chevy can be unsettling. It might appear while you’re driving to work, running errands, or on a long road trip. While it can be alarming, in many cases, a check engine light is simply an early warning sign of a potential issue within your vehicle’s systems, not necessarily an indication of imminent engine failure. This light is connected to your Chevy’s powertrain, which includes the engine, transmission, and emissions control system. The cause could be something as simple as a loose gas cap or a more complex issue like a failing oxygen sensor. Regardless of the severity, addressing a check engine light promptly is crucial to prevent potential further damage and costly repairs.
Since the early 1980s, vehicles, including your Chevy, have been equipped with an On-Board Diagnostics (OBD) system. This system constantly monitors your car’s performance, diagnosing potential problems and storing Diagnostic Trouble Codes (DTCs). These codes are essentially error messages that help both car owners and mechanics pinpoint the source of the check engine light. Typically, an OBD2 scanner is used to retrieve these codes, providing valuable insights into the problem. However, what if you don’t have a scanner handy? This guide will explore methods you can use to read OBD2 codes on your Chevy without a scanner, empowering you to understand your car’s health and take appropriate action.
Decoding Your Chevy’s Check Engine Light: What the Light is Telling You
Before diving into methods for reading codes without a scanner, it’s important to understand what your Chevy’s check engine light is trying to communicate. The way the light illuminates—its color and behavior—offers initial clues about the urgency and nature of the problem.
Solid Yellow or Orange Check Engine Light: If your Chevy’s check engine light is a steady yellow or orange, it signifies that the OBD system has detected a malfunction in a component or system. While the issue requires attention, it’s generally not considered an emergency. Your Chevy can still function, but it’s not operating at its optimal level and needs to be inspected. In this scenario, you can usually drive your Chevy for a short period, ideally no more than 100 miles, before diagnosing the problem. It’s recommended to get the codes checked as soon as possible to prevent potential minor issues from escalating into more significant repairs.
Solid Red Check Engine Light: A solid red check engine light indicates a more serious issue that needs prompt attention. While not always catastrophic, it suggests a problem that could potentially worsen if ignored. If your Chevy displays a solid red check engine light, it’s advisable to drive it to a qualified mechanic or Chevy dealership for diagnosis and repair as soon as you can safely do so.
Flashing Check Engine Light: A flashing or blinking check engine light is a critical warning. It often signals a severe problem, such as engine misfire, that could cause immediate damage to your Chevy. If your check engine light is flashing, it’s crucial to pull over to a safe location immediately. Continuing to drive with a flashing check engine light can lead to significant engine damage. Contact roadside assistance or a towing service to transport your Chevy to a certified mechanic or dealership for immediate attention.
Understanding the different states of your check engine light, from solid to flashing, is crucial for assessing the urgency of the issue and deciding on the next steps for your Chevy.
Reading Chevy OBD2 Codes the Standard Way: Using a Scanner
The most straightforward and recommended method to read OBD2 codes on your Chevy is by using an OBD2 scanner. These scanners are readily available at most auto parts stores, and some stores even offer free code scanning services. An OBD2 scanner provides a quick and efficient way to access the diagnostic information stored by your Chevy’s computer system. Beyond just reading check engine light codes, scanners can also provide access to your Chevy’s Vehicle Identification Number (VIN), calibration information, and other vital vehicle data.
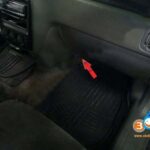
In your Chevy, the OBD2 port is typically located on the driver’s side, underneath the dashboard. Accessing it is usually quite simple. Once you have a scanner, follow these steps to read the codes:
- Locate the OBD2 Port: Find the OBD2 port under the dashboard on the driver’s side of your Chevy.
- Plug in the Scanner: Connect the OBD2 scanner into the port. Ensure it’s firmly plugged in.
- Turn on the Ignition: Turn your Chevy’s ignition to the “ON” position. This provides power to the scanner and the OBD2 system, but do not start the engine.
- Enter Vehicle Information (If Required): Some scanners might prompt you to enter your Chevy’s VIN or other vehicle-specific information. Follow the scanner’s instructions if prompted.
- Initiate the Scan: Press the “scan” or “read codes” button on the scanner.
- Record the Codes: The scanner will display the diagnostic trouble codes. Write these codes down. They are usually in a format like “P0123” (P followed by four digits). Refer to a reliable OBD2 code database or consult a mechanic to understand the meaning of each code.
Clearing Codes with an OBD2 Scanner (After Repair)
Many OBD2 scanners also have the ability to clear codes after you’ve addressed the underlying issue causing the check engine light. After performing the necessary repairs on your Chevy, you can use the scanner to reset the system and turn off the check engine light. To do this, typically you would navigate the scanner’s menu to find an option like “Erase Codes” or “Clear Codes” and follow the prompts.
It’s important to remember that simply clearing the codes without fixing the problem is not a solution. If the underlying issue persists, the check engine light will likely reappear soon. Clearing codes is only recommended after you have properly diagnosed and repaired the problem that triggered the codes in the first place.
Alternative Methods: Reading Chevy Engine Codes Without a Scanner
While using an OBD2 scanner is the easiest and most accurate way to read codes, there are alternative methods you can try if you don’t have access to one. These methods are less reliable and might not work on all Chevy models, especially newer ones with advanced computer systems. However, they are worth exploring in a pinch.
Method 1: The Odometer Reset Technique (May Vary by Chevy Model)
Some older Chevy models, and potentially some specific newer models, may allow you to retrieve diagnostic codes through the odometer display using a specific sequence of button presses. This method is not universally applicable to all Chevys, and its success can depend on the year and model of your vehicle. Here’s a general approach to try:
- Press and Hold Reset Button: Press and hold the odometer reset button on your Chevy’s instrument cluster.
- Press and Hold Trip Button: While holding the odometer reset button, press and hold the odometer trip button.
- Turn Ignition to “ON”: Keep holding both buttons and turn the ignition switch to the “ON” position (do not start the engine).
- Release Buttons: After turning the ignition on, release both the odometer reset and trip buttons.
- Observe Odometer Display: Watch the odometer display. In some cases, diagnostic trouble codes might appear in the odometer window. Record any codes that appear.
Method 2: Ignition Cycling Method (Less Likely to Work on Modern Chevys)
Another less reliable method involves cycling the ignition key in a specific pattern. This method is even less likely to work on modern Chevy vehicles with sophisticated electronic systems, but it might be worth attempting on older models.
- Turn Ignition “ON” and “OFF”: Insert your key and rapidly turn the ignition from the “ON” position to the “OFF” position and back to “ON” several times (typically 3 to 5 times) in quick succession. End with the ignition in the “ON” position (do not start the engine).
- Observe Dashboard Lights: Watch the dashboard. If the method is going to work, you might see all the warning lights illuminate briefly and then turn off, except for the check engine light.
- Check Odometer or Engine Light Pulses: Look at the odometer display to see if any codes are displayed. If not, carefully observe the check engine light itself. In some older systems (primarily OBD1, which is very unlikely on a modern Chevy), the check engine light might flash in a pattern of pulses and pauses to represent the diagnostic code (see Method 3 below for interpretation if this happens).
Method 3: Interpreting Check Engine Light Pulses (Primarily for Older OBD1 Chevys – Unlikely on Modern Models)
This method is relevant for very old vehicles, primarily those using the older OBD1 system, which is highly unlikely in any Chevy manufactured in recent decades. OBD1 systems used a series of flashes from the check engine light to communicate codes. If you suspect your very old Chevy might be using OBD1 and the ignition key cycling method (Method 2) seems to produce flashes from the check engine light, you might attempt to interpret these pulses.
- Observe Pulses and Pauses: Carefully watch the check engine light for a pattern of flashes (pulses) and pauses.
- Count Pulses and Pauses: Each series of pulses represents a digit in the code. A longer pause separates the digits. For example, if you see: Pulse, Pulse, Pause, Pulse, Pulse, Pulse, Pulse, Pulse – this could be interpreted as code 25 (two pulses, a pause, then five pulses).
- Consult OBD1 Code Chart: If you manage to get a sequence of pulses, you’ll need to find an OBD1 code chart specific to your Chevy model and year to decipher the meaning of the code. OBD1 codes are not standardized like OBD2 codes, so you’ll need a Chevy-specific OBD1 code list.
Method 4: The Paperclip Method for OBD1 (Extremely Unlikely for Modern Chevys)
Similar to Method 3, the paperclip method is exclusively for very old vehicles with OBD1 systems. It involves manually creating a circuit to trigger the OBD system to output codes via flashing check engine light pulses. This method is highly unlikely to be applicable to any modern Chevy.
- Locate OBD Port Terminals: Identify the diagnostic connector (OBD1 port) on your old Chevy, usually under the dashboard. You’ll need to identify the specific terminals to jump (consult a repair manual for your specific very old Chevy model).
- Use Paperclip or Jumper Wire: With the ignition OFF, use a paperclip or jumper wire to connect (jump) the designated terminals in the OBD1 port. Incorrectly jumping terminals can damage your vehicle’s electrical system, so proceed with extreme caution and only if you are certain you have identified the correct terminals from a reliable source like a repair manual for your specific vehicle.
- Turn Ignition to “ON”: Turn the ignition switch to the “ON” position (do not start the engine).
- Observe Check Engine Light Pulses: Watch the check engine light and record the pattern of pulses and pauses, just as described in Method 3, to determine the OBD1 code.
Important Warning Regarding Methods 3 & 4: Methods 3 and 4 are for obsolete OBD1 systems and should not be attempted on modern OBD2-equipped Chevys. Attempting these methods on an OBD2 system could potentially damage your vehicle’s electronics. Modern Chevys are overwhelmingly OBD2 compliant.
When to Seek Professional Help for Your Chevy’s Check Engine Light
While these scanner-less methods might provide some clues, they are not as reliable or comprehensive as using an OBD2 scanner. Furthermore, even if you manage to retrieve a code, understanding the root cause and performing the correct repair often requires automotive expertise.
It’s always recommended to seek professional help from a qualified mechanic or a certified Chevy technician in the following situations:
- Flashing Check Engine Light: As mentioned earlier, a flashing check engine light indicates a serious issue requiring immediate professional attention.
- Solid Red Check Engine Light: A solid red light also suggests a problem that needs prompt professional diagnosis and repair.
- Uncertainty About Diagnosis: If you are unsure about the meaning of the codes you’ve retrieved (whether using a scanner or alternative methods) or lack the experience to diagnose the problem accurately, consult a professional.
- Complex Repairs Required: Many check engine light issues require specialized tools, diagnostic equipment, and technical knowledge to repair correctly. Attempting complex repairs yourself without proper training can lead to further damage or safety issues.
- Persistent Check Engine Light: If you’ve tried clearing the codes after a repair (or attempted a repair), and the check engine light returns quickly, it indicates that the underlying problem has not been resolved. Professional diagnosis is necessary.
For accurate diagnosis and reliable repairs, especially for complex check engine light issues on your Chevy, consulting a professional mechanic equipped with advanced diagnostic tools is highly recommended.
Conclusion: Empowering Yourself to Understand Your Chevy’s Check Engine Light
Understanding your Chevy’s check engine light and knowing how to access diagnostic codes is a valuable skill for any car owner. While an OBD2 scanner remains the most effective tool for this purpose, the alternative methods described can offer a way to get preliminary information when a scanner is not available. However, it’s crucial to recognize the limitations of scanner-less methods and to prioritize professional diagnosis and repair, especially for serious or persistent check engine light issues. By being proactive and informed about your Chevy’s warning signals, you can ensure its longevity, safety, and optimal performance.