The Check Engine Light (CEL) illuminating on your dashboard can be a moment of dread for any car owner. In the past, deciphering the issue required a trip to a mechanic and often, a hefty bill. However, thanks to standardized On-Board Diagnostics II (OBD2) systems in modern vehicles, understanding what’s going on under the hood has become more accessible than ever. This guide will walk you through how to do an OBD2 scan, empowering you to understand your car’s health and potentially save money on unnecessary repairs.
Understanding OBD2 and DTCs: Your Car’s Language
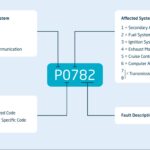
Since 1996, OBD2 has been mandatory in most vehicles sold in the United States and other parts of the world. This system is essentially your car’s self-diagnostic tool, monitoring various systems from emissions to engine performance. When something goes wrong, the OBD2 system generates a Diagnostic Trouble Code (DTC). Think of DTCs as error messages from your car, each code corresponding to a specific issue.
These codes are not generic across all vehicles. The specific data logged and the sophistication of the OBD2 implementation can vary significantly between makes and models. For example, a 1997 Subaru will likely log far less data compared to a modern vehicle like a 2015 Chevy Cruise.
However, the fundamental principle remains the same: OBD2 systems detect and report problems through DTCs, giving you a starting point for diagnosis.
Decoding DTCs: Beyond the Basic Error Code
When a DTC is triggered, the OBD2 system often captures a “freeze frame” of data. This freeze frame is a snapshot of your car’s operating conditions at the exact moment the fault occurred. This includes a wealth of information accessed through OBD2 Mode 2, such as:
- RPM (Revolutions Per Minute): How fast your engine is spinning.
- Vehicle Speed: How fast your car was traveling.
- O2 Sensor Data: Readings from your oxygen sensors, crucial for emissions and fuel efficiency.
- Mass Airflow (MAF) Data: Measures the air entering the engine.
- Fuel Trims (Short and Long Term): Adjustments the engine computer makes to fuel delivery.
- Ignition Advance: Timing of the spark plugs firing.
- Intake and Coolant Temperature: Engine operating temperatures.
Simple consumer scan tools often only display the basic “Pxxxx” DTC faults, accessed via OBD2 Mode 3. However, more advanced scan tools can access and display the valuable Mode 2 “freeze frame” data, providing deeper insights into the problem. This data is invaluable for pinpointing the root cause of an issue because it shows the exact conditions when the DTC was set.
Types of DTCs: Pending, Stored, and Historical
OBD2 systems categorize DTCs to help prioritize and understand the severity of the problem:
-
Pending DTCs (Mode 7): These codes indicate a detected fault, but the issue hasn’t occurred consistently enough to trigger the Check Engine Light. The fault needs to be detected again over a certain number of “drive cycles” to escalate to a stored code and illuminate the CEL. Pending codes are like warnings – they tell you something might be going wrong, but it’s not yet a confirmed problem.
-
Stored DTCs (Logged DTCs): These are confirmed fault codes that have triggered the Check Engine Light. A stored DTC means the OBD2 system has repeatedly detected the problem, and it requires attention. By OBD2 definition, these codes must illuminate the CEL.
-
Historical DTCs: Some vehicles, particularly newer models with more sophisticated Engine Control Units (ECUs), can store a history of fault codes, even after they have been repaired and cleared. This historical data can be incredibly useful for technicians in diagnosing intermittent problems or understanding the vehicle’s maintenance history, even when no current DTCs are present.
Performing an OBD2 Scan: A Step-by-Step Guide
Now, let’s get to the practical part: how to do an OBD2 scan yourself. It’s a straightforward process that requires a few simple steps:
-
Get an OBD2 Scanner: You’ll need an OBD2 scanner tool. These range from basic handheld scanners that display DTCs to more advanced scan tools that can show freeze frame data, live data streams, and even perform bidirectional tests. You can purchase scanners online or at auto parts stores. Some smartphone apps also work with Bluetooth OBD2 adapters to perform scans.
-
Locate the OBD2 Port: The OBD2 port is typically located under the dashboard on the driver’s side of your vehicle. It’s usually within a foot or two of the steering column. Refer to your vehicle’s owner’s manual if you have trouble locating it. The port is a standardized 16-pin connector.
-
Connect and Scan:
- Turn your car’s ignition to the “ON” position, but do not start the engine. This provides power to the OBD2 system.
- Plug your OBD2 scanner into the OBD2 port. Ensure it’s firmly connected.
- Follow the scanner’s instructions to initiate a scan. Typically, you’ll select an option like “Read Codes” or “Diagnostic Scan.”
- The scanner will communicate with your car’s computer and retrieve any stored DTCs.
-
Interpret the Results: Once the scan is complete, the scanner will display any DTCs found.
- Record the Codes: Write down or take a picture of the DTC codes displayed.
- Look Up the Codes: Use the scanner’s built-in database (if available) or search online for “OBD2 code [your code]” (e.g., “OBD2 code P0300”). This will provide a description of the fault. Reputable websites and apps like those from auto parts retailers or dedicated OBD2 information sites can be helpful.
- Analyze Freeze Frame Data (Advanced Scanners): If you have a more advanced scanner, explore the freeze frame data associated with the DTC. This data can provide clues about the conditions that caused the fault.
Alt text: Diagram showing the typical location of an OBD2 port under the dashboard of a car on the driver’s side.
Note: Please replace the url with an actual image URL of an OBD2 port location.
Clearing DTCs: Proceed with Caution and Understanding Monitors
OBD2 scanners often have the ability to clear DTCs and turn off the Check Engine Light. However, clearing codes should be done with caution and understanding:
-
DTCs Can Clear Themselves: It’s important to know that DTCs do not always need to be manually cleared. If the underlying issue that caused the fault is repaired or resolves itself (for example, a temporary misfire), the DTC will eventually clear itself after a certain number of “clean” drive cycles without the fault reoccurring. The number of drive cycles varies depending on the fault and vehicle.
-
Clearing Codes is Often a Courtesy: Technicians often clear codes after a repair to assure the customer that the issue is resolved and the Check Engine Light is off. However, from a technical standpoint, it’s not always necessary.
-
Flashing CEL – Never Ignore: A flashing Check Engine Light is significantly different from a solid CEL. A flashing CEL indicates a severe issue that could cause vehicle damage, such as a serious misfire potentially damaging the catalytic converter. In this case, immediate attention is required, and some manufacturers recommend pulling over and having the vehicle towed.
-
Clearing Codes Resets Monitors: Clearing DTCs is like a “reset” for your car’s computer. It not only erases the fault codes but also resets the “monitors.”
OBD2 Monitors and Drive Cycles: The Key to Emissions Readiness
Monitors are a set of self-tests that the OBD2 system runs to verify the proper functioning of various emission-related systems. These tests run either continuously or when specific criteria are met (e.g., temperature, engine load, fuel level, drive cycle).
“Drive cycles” are specific driving patterns that allow the OBD2 system to run these monitor tests. Completing these drive cycles is crucial for passing emissions inspections. After clearing DTCs, even if the underlying problem is fixed, your car might not immediately pass an emissions test because the monitors will be in a “not ready” state.
It takes a certain number of successful drive cycles, meeting specific criteria, for all monitors to complete and show a “ready” status. Only when the monitors are ready can your vehicle pass an OBD2 emissions inspection. This prevents simply clearing codes right before an inspection to mask underlying issues.
Alt text: Illuminated Check Engine Light icon on a car dashboard, indicating a potential vehicle issue.
Note: Please replace the url with an actual image URL of a Check Engine Light.
Conclusion: OBD2 Scanning – Your First Step in Car Care
Understanding how to do an OBD2 scan is a valuable skill for any car owner. It empowers you to:
- Understand your Check Engine Light: Decipher the meaning behind that dreaded light.
- Diagnose Problems Early: Identify potential issues before they become major repairs.
- Communicate Effectively with Mechanics: Provide mechanics with DTC codes for faster and more accurate diagnoses.
- Save Money: Potentially avoid unnecessary trips to the mechanic for simple issues or get a better understanding of needed repairs.
While an OBD2 scan provides valuable information, it’s important to remember that it’s just the first step in diagnosing car problems. DTCs point you in the right direction, but further investigation and professional expertise may be needed for complex issues. However, by learning how to do an OBD2 scan, you gain a significant advantage in understanding and maintaining your vehicle.