The 5th generation Toyota 4Runner is a fantastic SUV, renowned for its off-road capability and reliability. However, many owners find the factory amber interior lighting somewhat lacking, especially in terms of brightness. If you’re looking to enhance your 4runner Interior visibility and give it a modern touch, upgrading to LED interior lights is a straightforward and impactful DIY project. This guide will walk you through the process of replacing your 4Runner’s interior bulbs with brighter, more efficient LEDs.
Upgrading your 4runner interior lights to LED offers several benefits. LEDs provide a significantly brighter and whiter light compared to the traditional amber bulbs, making it easier to see inside the cabin at night. They also consume less power and have a longer lifespan, meaning you won’t have to replace them as often. This guide will cover the replacement of the lower door lights, rear door dome lights, the interior dome light, and the map lights, ensuring a complete transformation of your 4runner interior illumination.
Tools and Parts You’ll Need
Before you begin, gather the necessary tools and parts to make the installation process smooth.
-
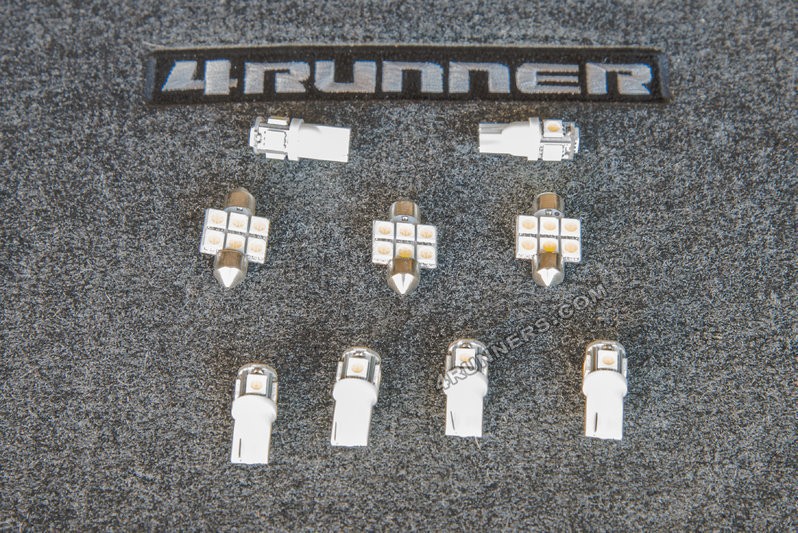
LED Interior Light Kit: Purchase an LED interior light kit specifically designed for the 5th Gen Toyota 4Runner. Kits typically include LEDs for map lights, dome lights, and door lights. A recommended source is member csjumper2003 on tacomaworld. Ensure the kit includes 9 lights: 2 map lights, 4 lower door lights, 1 dome light, and 2 rear door dome lights.
-
Interior Pry Tool or Small Screwdriver: A plastic interior pry tool is ideal to prevent damage to plastic trim, but a small standard screwdriver can also be used carefully.
Step-by-Step LED Interior Light Upgrade for Your 4Runner
Let’s break down the installation process step-by-step, starting with the lower door lights.
Upgrading the Lower Door Lights
The lower door lights in the 4Runner are notoriously dim. Replacing them with LEDs will significantly improve visibility when entering and exiting your vehicle at night.
-
Prying Open the Light Assembly: Locate the lower door light assembly. Using your pry tool or screwdriver, gently pry open the light assembly on the right side, in the middle part of the light.
-
Assembly Pop Loose: The assembly will pop loose from the door panel.
-
Disconnecting the Power Clip: Disconnect the power clip from the light assembly.
-
Separating the Light Cover: Locate the small tab on the light assembly. Pry up this tab and slide the grey part and the clear cover apart.
-
Removing the Grey Hood: Gently pop off the grey hood to access the bulb.
-
Replacing the Bulb with LED: Pull out the stock bulb and insert the LED bulb.
-
Testing the LED: Before reassembling, reconnect the power clip to the light assembly and test if the LED turns on. LEDs are polarity sensitive, so if it doesn’t light up, remove the LED, rotate it 180 degrees, and reinsert it. It should now illuminate. Test each LED before full reassembly to avoid extra work.
-
Reattaching the Grey Hood: If the LED works, pop the grey hood back onto the assembly.
-
Reattaching the Cover: Reattach the clear cover to the assembly.
-
Reconnecting and Reinstalling: Reconnect the power cable. Insert the left side of the assembly into the door panel first, then push the right side until it pops into place. Repeat this process for the remaining three door lights.
Replacing the Rear Door Dome Lights
Next, let’s upgrade the rear door dome lights to enhance the 4runner interior cargo area lighting.
-
Prying Open the Rear Dome Light: For the rear door dome lights, located on the side panels in the cargo area, push your pry tool or small screwdriver upwards on the driver’s side edge. This will push back a metal clip.
-
Sliding Out the Assembly: Once the clip is released, the light assembly will slide out and hang by the power cable.
-
Removing the Light Cover: Pop off the clear cover. There are four tabs on the edge; handle them gently as they can be fragile.
-
Accessing the Bulb: The bulb is held in place at two points. One of these is flexible. Push down the flexible tab (located at the bottom of the light in this case) to release the bulb.
-
Inserting the LED: Insert the LED bulb. Ensure the LEDs are pointed outwards for optimal light distribution. Test the light by turning the switch to the ‘on’ position. If it doesn’t light up, reverse the LED’s direction.
-
Reattaching the Cover and Reinstalling: Reattach the clear cover and reinsert the assembly power cable side first. Then, press the side with the metal clip back into place until it pops in. Repeat for the other rear door dome light.
Swapping the Interior Dome Light
The main interior dome light is centrally located and contributes significantly to overall 4runner interior brightness.
-
Removing the Cover: For the interior dome light, only the cover needs to be removed. Locate the two spots on the side of the cover facing the front of the 4Runner, near the switch. Use your pry tool or screwdriver to pop the cover off at these points. The light assembly remains mounted to the ceiling.
-
Accessing and Replacing the Bulb: Inside, you’ll find the same type of bulb as the rear dome lights, held by a flexible metal tab. It can be a tight space, especially for larger hands. Carefully remove the stock bulb and insert the LED. Test the LED before reassembling.
-
Reattaching the Cover: If the LED works, simply pop the cover back onto the dome light assembly.
Installing LED Map Lights
The map lights are often the most challenging due to limited access.
-
Prying Open the Map Light Console: Start by using your pry tool or screwdriver on the side of the map light console closest to you (towards the rear of the vehicle).
-
Removing the Console Section: Remove the section you just pried open.
-
Removing the Upper Console (Recommended): While it might be possible to reach the bulbs directly, removing the upper console provides significantly more working space and is highly recommended.
-
Start on the windshield side of the crawl control box (if equipped). Locate the two openings to pry downwards. Apply gentle pressure to pry it down.
-
The crawl control box will detach. Disconnect it and set it aside.
-
Locate and undo the two bolts (likely 8mm) in the opening where the crawl control box was mounted.
-
Pull down the upper console. It is held by two connectors which will pop loose. Be gentle as there’s a cable attached you don’t want to damage.
-
With the console loose, you have clear access to the map lights.
-
-
Replacing the Map Light Bulbs: On the back side of the console, find the two black connectors for the map lights. Turn them about a half turn to remove them along with the installed bulbs.
-
Inserting LEDs and Reassembling: Insert the LED bulbs, test them, and if they work, reinstall the upper console in reverse order of removal.
Enjoy Your Brighter 4Runner Interior
After completing these steps, you’ll immediately notice a significant improvement in your 4runner interior lighting. The brighter LED lights provide enhanced visibility and a modern aesthetic.
Congratulations on upgrading your 4runner interior lights! This simple modification makes a noticeable difference in both functionality and the overall ambiance of your vehicle.