Tire Pressure Monitoring Systems (TPMS) are crucial for modern vehicle safety and efficiency. They alert drivers to low tire pressure, which can lead to increased fuel consumption, tire wear, and potential safety hazards. While most vehicles display a warning light when tire pressure is low, accessing detailed, real-time TPMS data can provide a deeper understanding of your vehicle’s tire health. This is where Obd2 With Tpms capabilities come into play, offering an advanced way to monitor your tires.
OBD2 scanners, when paired with the right software and adapters, can unlock a wealth of data from your vehicle’s computer system, including real-time TPMS readings. For car enthusiasts and those keen on vehicle maintenance, using an OBD2 scanner with TPMS functionality offers a significant advantage. This guide will walk you through the process of using an OBDLink MX+ OBD2 adapter and the OBDLink app to access and monitor your vehicle’s TPMS data.
Why Use OBD2 for TPMS Monitoring?
Traditionally, checking tire pressure meant manually using a tire pressure gauge at each tire. While effective, this method is time-consuming and doesn’t provide real-time data while driving. Integrating OBD2 with TPMS monitoring provides several key benefits:
- Real-time Data: OBD2 scanners can display live tire pressure readings as you drive, allowing you to monitor for fluctuations and potential issues immediately.
- Comprehensive Insights: Beyond just warning lights, OBD2 systems can provide specific pressure readings for each tire, giving a detailed view of your tire health.
- Convenience: Access TPMS data directly from your smartphone or tablet via the OBDLink app, eliminating the need for manual checks unless physically inspecting the tires.
- DIY Car Maintenance: For those who enjoy vehicle maintenance, OBD2 with TPMS is a valuable tool for proactive monitoring and early issue detection, contributing to overall vehicle health and safety.
Setting Up Your OBDLink MX+ for TPMS Access
To leverage OBD2 with TPMS capabilities, you’ll need a compatible OBD2 adapter and the OBDLink app. This guide focuses on the OBDLink MX+ and the OBDLink Android app, tested on a Toyota 4Runner. The process should be similar for other compatible vehicles and devices, but always refer to your adapter and app documentation for specific instructions.
Prerequisites: Software and Vehicle Compatibility
Before starting, ensure you have the following:
- OBDLink MX+ OBD2 Adapter: This adapter is known for its advanced features and compatibility, including enhanced OEM support needed for TPMS data on some vehicles.
- OBDLink App: Download and install the OBDLink app on your Android or iOS device.
- Toyota, Lexus, Scion Enhanced OEM Add-Ons: Within the OBDLink app, you’ll need to install these specific add-ons to access TPMS data on Toyota, Lexus, and Scion vehicles. These add-ons are typically available as in-app purchases.
- Compatible Vehicle: This guide is based on a 2019 Toyota 4Runner. Compatibility may vary depending on your vehicle’s make, model, and year. Check OBDLink’s compatibility lists to ensure your vehicle is supported for enhanced OEM diagnostics.
Step 1: Configuring Vehicle Parameters in the OBDLink App
First, you need to input your vehicle information into the OBDLink app. This step is crucial for the app to correctly interpret data from your vehicle’s computer.
-
(a) Open OBDLink App: Launch the OBDLink application on your device.
-
(b) DO NOT Connect to MX+: Ensure the app is open but not yet connected to your OBDLink MX+ adapter.
-
(c) Select Settings: Navigate to the “Settings” menu within the app.
-
(d) Select Vehicle Editor: Choose the “Vehicle Editor” option.
-
(e) Enter your vehicle information: Input details about your vehicle, such as year, make, and model.
Alt Text: Vehicle editor screen in the OBDLink app showing options to input vehicle details like year, make, and model for OBD2 with TPMS setup.
-
(f) For the Enhanced Network setting you MUST select “Prompt”: This is a critical step for accessing TPMS data. Set the “Enhanced Network” setting to “Prompt”. This setting allows you to choose the specific enhanced network you want to access (in this case, TPMS) each time you connect.
-
(g) Take defaults for the rest of the pages values if you do not know what they should be: For other settings in the Vehicle Editor, you can leave the default values unless you have specific adjustments to make. For example, you might optionally change “Engine Size” and “Fuel Tank Capacity” if desired, but it’s not required for TPMS functionality.
-
(h) Hit the back button: Save your vehicle settings and return to the main Settings menu.
Step 2: Updating MX+ Firmware
Keeping your OBDLink MX+ adapter’s firmware updated is essential for optimal performance and compatibility. Firmware updates can include bug fixes, performance improvements, and support for new features or vehicles.
- (a) Plug the MX+ into your OBD II port (and Open OBDLink app if not already Open): Connect your OBDLink MX+ adapter to your vehicle’s OBD II port, typically located under the dashboard on the driver’s side. Open the OBDLink app if it’s not already running.
- (b) DO NOT Connect to MX+ (Disconnect if already Connected): Ensure the app is not connected to the MX+ adapter at this stage. Disconnect if it is currently connected.
- (c) Select Settings: Go to the “Settings” menu in the OBDLink app.
- (d) Select Firmware Updates: Choose the “Firmware Updates” option.
- (e) Select Check for Updates: Tap on “Check for Updates” to see if any firmware updates are available for your MX+ adapter.
- (f) Select Update Firmware if there are any: If updates are found, select “Update Firmware” to begin the update process. Follow the on-screen instructions to complete the firmware update.
- (g) Hit the Back button: Once the firmware update is complete (if any), return to the main Settings menu.
Step 3: Setting Units to PSI (Pounds per Square Inch)
Tire pressure is commonly measured in PSI (pounds per square inch) in many English-speaking countries. Setting your units preference in the OBDLink app ensures that TPMS readings are displayed in your preferred unit.
- (a) Open OBDLink App (if not already Open): Launch the OBDLink app if it’s not already open.
- (b) DO NOT Connect to MX+ (Disconnect if already Connected): Make sure the app is not connected to the MX+ adapter.
- (c) Select Settings: Navigate to the “Settings” menu.
- (d) Select Preferences: Choose the “Preferences” option.
- (e) Select Units: Select “Units” from the Preferences menu.
- (f) Select “psi” for Pressure: Choose “psi” (pounds per square inch) as the unit for pressure. You can also set other unit preferences on this page as desired (e.g., temperature, speed, etc.).
- (g) Hit the Back button: Save your unit preferences and return to the main Preferences menu. You can further customize other preferences as needed.
Creating a TPMS Dashboard in the OBDLink App
With the initial setup complete, you can now create a custom dashboard in the OBDLink app to display your TPMS data.
Step 4: Adding a New Dashboard
Dashboards in the OBDLink app are customizable screens where you can display various gauges and data points. You’ll create a new dashboard specifically for TPMS monitoring.
- Hit the Back button until you reach the main page: Navigate back to the main screen of the OBDLink app.
- Tap the Dashboard icon: Locate and tap the “Dashboard” icon, usually found in the lower left corner of the screen.
- In the lower left corner tap the vertical ellipses to open the menu: Look for a vertical ellipsis (three dots) icon, typically in the lower left corner of the dashboard screen, and tap it to open the dashboard menu.
- Select Add Dashboard: Choose “Add Dashboard” from the menu options. This will create a new, blank dashboard.
- When the new blank Dashboard is shown, Open the menu again: Once the new blank dashboard appears, open the dashboard menu again by tapping the vertical ellipsis icon.
Step 5: Adding TPMS Data Displays
Now you’ll add digital gauges to your TPMS dashboard to display tire pressure readings.
-
Select Add Display: From the dashboard menu, choose “Add Display”.
-
In the Display Type pop up, Select Digital Gauge for the TPMS options: In the “Display Type” pop-up window, select “Digital Gauge”. This type of display is well-suited for showing numerical TPMS data.
-
Select Dark from the Built-Ins (it’ll be a bit easier if you want to replicate the borderless, colorless background display style): You can customize the visual style of your gauges. For a clean look, consider selecting the “Dark” built-in style. This is optional and purely for visual preference.
-
In the next pop-up, ignore that it displays Vehicle Speed, and select the Item drop down menu (vehicle speed with a down arrow next to it): The gauge might initially default to displaying “Vehicle Speed”. Ignore this default and tap on the “Item” dropdown menu (it usually shows “Vehicle Speed” with a down arrow).
-
On the Select PIDs page, Select Toyota, Lexus, Scion (If this doesn’t show, you haven’t correctly installed the Toyota, Lexus, and Scion Enhanced OEM Add-Ons): This is a crucial step. On the “Select PIDs” (Parameter IDs) page, you MUST select “Toyota, Lexus, Scion”. If you don’t see this option, it indicates that you haven’t properly installed the Toyota, Lexus, and Scion Enhanced OEM Add-Ons within the OBDLink app. Go back and ensure these add-ons are installed.
-
On the OEM Add-Ons Select PIDs page, Select Tire Pressure Monitor in the Tire Pressure Monitor section: After selecting “Toyota, Lexus, Scion”, you’ll be taken to the “OEM Add-Ons Select PIDs” page. Scroll down and find the “Tire Pressure Monitor” section, then select “Tire Pressure Monitor” within that section.
-
On the OEM Tire Pressure Monitor Select PIDs page – the TPMS PIDs that worked for me were the ones closest to the bottom of the page: On the “OEM Tire Pressure Monitor Select PIDs” page, you’ll see a list of TPMS PIDs. The specific PIDs that work may vary slightly depending on your vehicle and software version. The original article notes that the PIDs that worked were located near the bottom of the list.
Alt Text: Screenshot of OBDLink app showing TPMS Parameter IDs (PIDs) list, highlighting the ‘Tire Inflation Pressure’ PIDs near the bottom of the list for OBD2 TPMS setup.
-
…so I scrolled all the way to the bottom of the page and then back up slowly until I found the first ‘ID# Tire Inflation Pressure’ PID – ID5 was my spare – ID4 was my Right Front – ID3 was my Right Rear – ID2 was my Left Rear – ID1 was my Left Front: Carefully scroll through the list of TPMS PIDs, starting from the bottom and moving upwards. Look for PIDs labeled “ID# Tire Inflation Pressure”. The original article identified the following PID assignments for their 2019 4Runner:
- ID5: Spare Tire
- ID4: Right Front Tire
- ID3: Right Rear Tire
- ID2: Left Rear Tire
- ID1: Left Front Tire
- Don’t worry if you get something wrong, you can fix the settings and everything else later once you get a feel for the way this app works: If you are unsure or select the wrong PID initially, you can always edit the display settings later to correct it.
- Selecting a PID simply puts a check mark at the far right side of the page, when you have done that, Select Done at the top of the page: To select a PID, simply tap on it. A checkmark will appear to indicate it’s selected. Once you have selected the desired PID for the first tire, tap “Done” at the top of the page.
-
Tap the title and change the text to something shorter that will display better e.g. “Spare PSI”, “RR Tire PSI”, etc…: The digital gauge will now appear on your dashboard displaying the selected TPMS PID data. Tap on the title of the gauge (it might default to the PID name) and rename it to something more descriptive and concise, like “Spare PSI”, “Right Front PSI”, “Left Rear PSI”, etc. This makes it easier to identify each tire’s reading on your dashboard.
-
Tap Done on the virtual keyboard: After renaming the display, tap “Done” on the virtual keyboard.
-
Tap OK to save that Display onto your Dashboard: Finally, tap “OK” to save the configured display and add it to your TPMS dashboard.
Step 6: Customizing Display Styles
You can further customize the appearance of your TPMS displays for better readability and visual appeal.
- At this point, if you want to change the display format for this type of Display Item, follow the instructions in the link instructions in the above post – To show the Display Edit options tap and hold on the display you want to format until the Edit Display pop up appears – Select Style and then make your edits, like the link above, I set mine similarly When you have your display style created and named, you can select that style from the Digital Gauge Select Item menu for future Displays: To customize a display’s style (e.g., colors, fonts, borders), tap and hold on the display gauge until the “Edit Display” pop-up appears. Select “Style” and adjust the settings to your preference. You can save custom styles and reuse them for other displays, ensuring a consistent look across your dashboard.
Step 7: Adding Displays for All Tires
Repeat the process from Step 5 to add digital gauges for the remaining TPMS PIDs (Left Front, Right Front, Left Rear, Right Rear, and Spare). For each additional tire, follow the same steps, selecting the corresponding “ID# Tire Inflation Pressure” PID and renaming the display accordingly (e.g., “LF Tire PSI”, “RF Tire PSI”, “LR Tire PSI”, “RR Tire PSI”, “Spare PSI”). Remember to select your custom Display Style if you created one in the previous step for visual consistency.
Connecting and Viewing Real-Time TPMS Data
With your TPMS dashboard set up, you’re now ready to connect to your vehicle and view live tire pressure readings.
Step 8: Connecting to Your Vehicle and Selecting TPMS Network
-
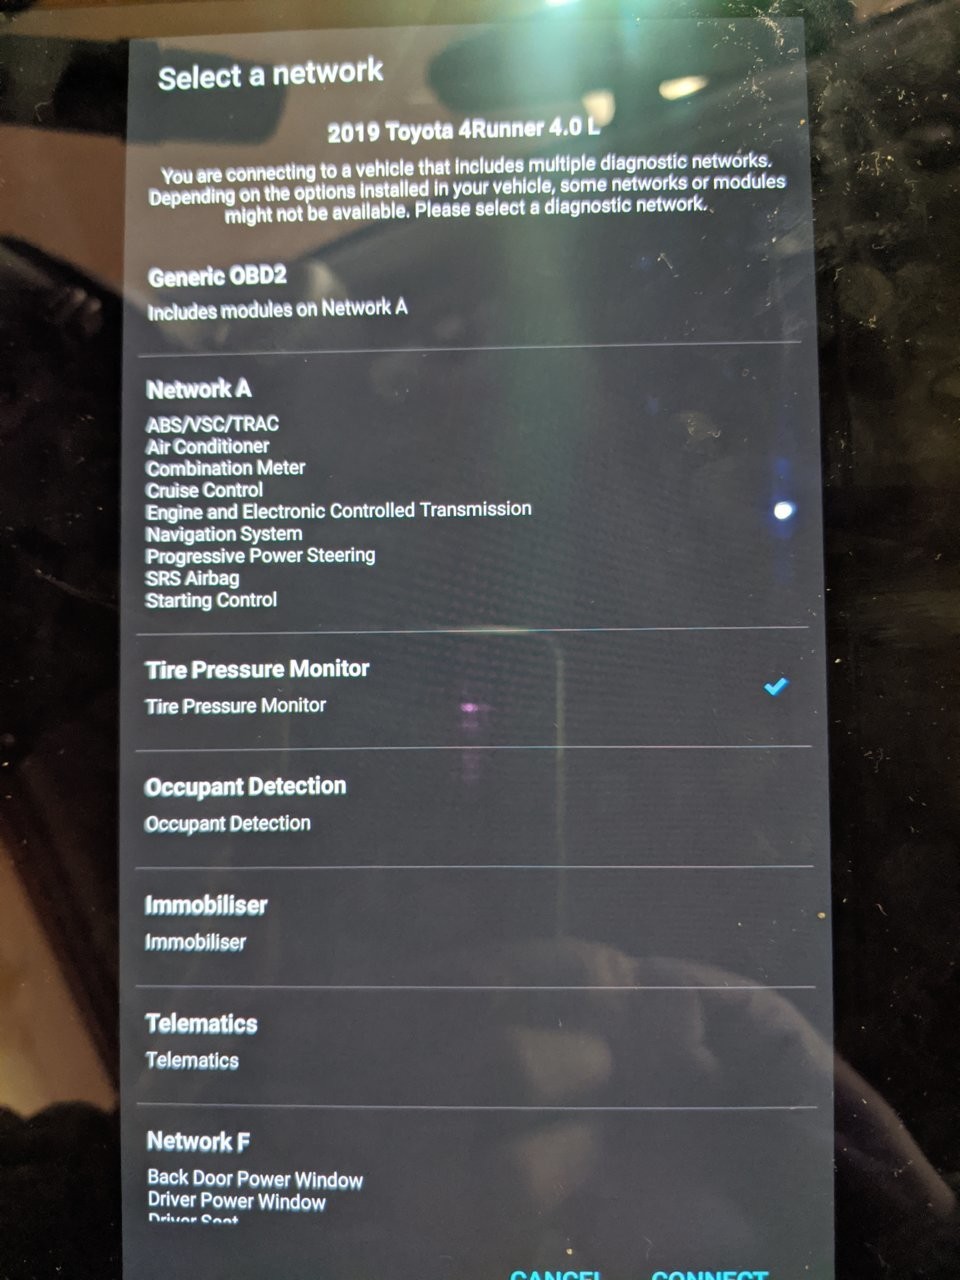
Remember that Prompt setting for Enhanced Network settings above? To view your TPMS data – Plug in your MX+ – Start your vehicle – Open the OBDLink app – Tap Connect – From the Enhanced Network settings, select Tire Pressure Monitor and Select Connect: Ensure your OBDLink MX+ is plugged into your vehicle’s OBD II port. Start your vehicle’s engine (the ignition must be ON and the engine running to read TPMS data in this case). Open the OBDLink app and tap the “Connect” icon. Because you set the “Enhanced Network” to “Prompt” in the Vehicle Editor, the app will now ask you to select which enhanced network you want to connect to. From the “Enhanced Network settings” prompt, choose “Tire Pressure Monitor” and then select “Connect”.
Alt Text: OBDLink app prompt showing Enhanced Network Settings, with “Tire Pressure Monitor” selected for OBD2 TPMS data access.
Step 9: Viewing Your TPMS Dashboard
-
Tap the Dashboard icon – Swipe left/right to get to your TPMS dashboard and view your pressures: Once connected to the TPMS network, tap the “Dashboard” icon again. Swipe left or right through your dashboards until you find the TPMS dashboard you created. You should now see real-time tire pressure readings displayed on the digital gauges you added.
Alt Text: OBDLink app dashboard displaying real-time tire pressure readings in PSI for all tires, including spare, using OBD2 with TPMS.
Conclusion
Using OBD2 with TPMS monitoring through devices like the OBDLink MX+ and the OBDLink app provides a powerful and convenient way to stay informed about your vehicle’s tire health. By following these steps, you can easily set up a TPMS dashboard and access real-time tire pressure data directly on your smartphone or tablet. This proactive approach to tire monitoring enhances safety, improves fuel efficiency, and contributes to the longevity of your tires. Explore the world of OBD2 with TPMS and take control of your vehicle’s diagnostics today.