Connecting your car’s On-Board Diagnostics II (OBD2) system to your laptop via Bluetooth is a game-changer for vehicle diagnostics and performance monitoring. This wireless connection allows you to access a wealth of real-time data, diagnose issues, and gain deeper insights into your vehicle’s health without messy cables. This guide provides a step-by-step walkthrough on how to establish a seamless Bluetooth connection between your OBD2 adapter and your laptop, empowering you with DIY car diagnostic capabilities.
Step 1: Enabling Bluetooth on Your Windows Laptop
Before attempting to connect your OBD2 adapter, ensure Bluetooth is active on your Windows laptop. Most modern laptops come with built-in Bluetooth.
-
For Laptops with Built-in Bluetooth:
- Typically, Bluetooth can be enabled through the Windows settings menu.
- Navigate to Settings (the gear icon in the Start menu).
- Click on Devices.
- Select Bluetooth & other devices from the left sidebar.
- Toggle the Bluetooth switch to On.
Refer to your laptop’s owner’s manual for specific instructions if you are unsure how to enable Bluetooth.
-
For Laptops Using a USB Bluetooth Adapter:
- If your laptop doesn’t have built-in Bluetooth, you’ll need a USB Bluetooth adapter.
- Insert the USB Bluetooth adapter into an available USB port on your laptop.
- Install the necessary drivers. Typically, Windows will automatically detect and install generic drivers. However, for optimal performance, it’s recommended to install the manufacturer-provided drivers, usually found on an included disc or their website. Follow the manufacturer’s instructions for driver installation.
Step 2: Locating the OBD2 Diagnostic Connector in Your Vehicle
The OBD2 diagnostic connector is a standardized port found in all cars and light trucks manufactured since 1996. Its location is mandated to be within the passenger compartment, easily accessible from the driver’s seat.
- Common Locations: The most frequent location is underneath the dashboard on the driver’s side. Look below the steering column and around the driver’s side footwell area.
- Hidden Connectors: Sometimes, the OBD2 port might be concealed by a small plastic cover. It could also be located behind an ashtray or a coin tray. In some European cars, it may be found within the glove compartment.
- Consult Your Vehicle’s Manual: If you are having trouble locating the OBD2 port, your vehicle’s owner’s manual will pinpoint its exact location.
The OBD2 connector is typically trapezoidal in shape with 16 pins.
Step 3: Plugging in Your Bluetooth OBD2 Adapter
Once you’ve located the OBD2 port, take your Bluetooth OBD2 adapter and carefully plug it in.
- Gentle Insertion: Align the adapter with the port and push it in gently but firmly. Avoid using excessive force. It should fit snugly and securely.
- Power Indicator: After successful insertion, the adapter should power on. Most Bluetooth OBD2 adapters have an LED indicator that lights up to confirm power. Typically, a ‘Power’ LED will illuminate, often in green, indicating it’s receiving power from the car’s battery.
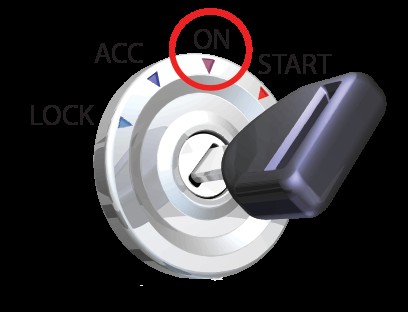
Step 4: Turning Your Vehicle Ignition to the ‘ON’ Position
To allow the OBD2 adapter to communicate with your car’s computer, you need to turn the ignition key to the ‘ON’ position. This provides power to the car’s systems without starting the engine.
- ‘ON’ Position Indication: The ‘ON’ position is often marked as ‘II’ on the ignition switch.
- Correct Key Position: Turn your key clockwise to the ‘ON’ position. This is usually the position right before you would crank the engine to start. You should see the dashboard lights illuminate.
Step 5: Making Your OBD2 Adapter Discoverable via Bluetooth
Now, you need to make your OBD2 adapter discoverable so your laptop can find and connect to it via Bluetooth.
- ‘Connect’ Button: Most Bluetooth OBD2 adapters have a ‘Connect’ button. Press this button to initiate the Bluetooth pairing process.
- Bluetooth Indicator Light: Upon pressing the ‘Connect’ button, a ‘Bluetooth’ or ‘BT’ LED on the adapter will usually start blinking more rapidly. This indicates it’s in pairing mode and discoverable.
- Time Limit: Be aware that many OBD2 adapters only stay in discoverable mode for a limited time, often around 2 minutes. If pairing takes longer, you may need to press the ‘Connect’ button again to re-enable discoverability.
Step 6: Pairing the OBD2 Adapter with Your Windows Laptop
With your OBD2 adapter in pairing mode and your laptop Bluetooth enabled, you can now pair the devices.
- Access Bluetooth Settings: On your Windows laptop, locate the Bluetooth icon in the system tray (usually in the bottom right corner of your screen). Right-click on the Bluetooth icon.
-
Add a Bluetooth Device: From the context menu, click on “Add a Bluetooth device” or “Add Device“. This will open the “Add a device” window.
-
Device Discovery: Windows will start scanning for nearby Bluetooth devices. Your OBD2 adapter should appear in the list of discovered devices, often named “OBDLink” or something similar, depending on the brand.
-
Select and Pair: Click on your OBD2 adapter (e.g., “OBDLink”) from the list and then click “Pair” or “Next“.
-
PIN Code (if required): In most cases, modern Bluetooth adapters will pair seamlessly. However, some older Bluetooth adapters or Windows versions might require a PIN code. If prompted for a PIN, try entering “1234” or “0000“. These are common default PINs for Bluetooth OBD2 adapters.
- Numeric Comparison (if applicable): Some newer Bluetooth protocols use Numeric Comparison for pairing. If you see a screen asking you to compare pairing codes, simply confirm that the codes match (if displayed) and select “Yes” or “Confirm“, then click “Next“. You can generally ignore the code comparison request in this scenario and proceed.
- Successful Pairing: Once pairing is complete, Windows will display a confirmation message indicating that the OBD2 adapter has been successfully connected and installed.
If the pairing fails, ensure the OBD2 adapter is still in discoverable mode (press the ‘Connect’ button again) and repeat the pairing steps.
Step 7: Installing OBD-II Diagnostic Software on Your Laptop
With the Bluetooth connection established, you’ll need OBD-II diagnostic software on your laptop to interpret the data from your car. There are various software options available, ranging from free to professional-grade paid applications. A popular free option often recommended for OBDLink adapters is OBDwiz.
- Download OBDwiz: Visit the official website (https://www.scantool.net/scantool/downloads/201/OBDwizSetup.exe) to download the latest version of OBDwiz.
- Installation: Run the downloaded setup file (OBDwizSetup.exe) and follow the on-screen instructions to install the software on your laptop.
Note: Ensure your OBD2 adapter is paired with your laptop and your vehicle ignition is in the ‘ON’ position before proceeding with the software setup.
Step 8: Initial Software Setup and Adapter Auto-Detection
After installing OBDwiz (or your chosen OBD-II software), launch the application.
- Auto Detect Feature: Most OBD-II software, including OBDwiz, has an “Auto Detect” or “Adapter Auto-Detect” feature. This automatically identifies the connected OBD2 adapter and configures the software to communicate with it. Locate and click the “Auto Detect” button within the software.
-
Port and Baud Rate Configuration: The software will scan COM ports and baud rates to find your OBD2 adapter. This process may take a few moments.
-
Adapter Confirmation: Once detected, a confirmation dialog box will appear, indicating that your OBD2 adapter has been found and configured.
Step 9: Connecting to Your Vehicle’s ECU
With the software configured for your adapter, the final step is to connect to your vehicle’s Engine Control Unit (ECU) to retrieve diagnostic data.
- ‘Connect’ Button in Software: Within your OBD-II software (like OBDwiz), find and click the “Connect” button.
- Protocol Detection: The software will initiate automatic protocol detection, cycling through various OBD-II protocols to determine which one your vehicle uses. A status screen will typically display the progress of this protocol detection.
- ECU Selection (if prompted): Modern vehicles often have multiple ECUs. OBD-II standards allow connection to one ECU at a time. The software might prompt you to select an ECU, often recommending the ECU with the most “Supported PIDs” (Parameter IDs – data points). Choose the recommended ECU and click “Continue“. You can always reconnect and select a different ECU later if needed.
Step 10: Accessing Vehicle Data and Diagnostics
Congratulations! You have successfully connected your OBD2 adapter to your laptop via Bluetooth. You can now access a wide range of vehicle data and diagnostic functions through your OBD-II software.
-
Explore Software Features: Familiarize yourself with the features of your chosen software. OBDwiz and other similar programs typically offer functionalities like:
- Reading and clearing ‘Check Engine’ light codes (DTCs).
- Real-time monitoring of vehicle parameters (engine speed, coolant temperature, etc.).
- Emissions readiness testing.
- Trip logging and data recording.
- Vehicle performance analysis.
-
Software Interface: Explore the software interface. Typically, tasks are organized on the left-hand side menu.
- Tabs and Actions: Within each task, you will find tabs for more specific information and action buttons to execute commands or view data.
By following these steps, you can effectively connect your OBD2 adapter to your laptop via Bluetooth and unlock the power of vehicle diagnostics at your fingertips. This setup empowers you to understand your car better, troubleshoot issues, and maintain peak vehicle performance.
